Hi Boox Popular Magazine 2024

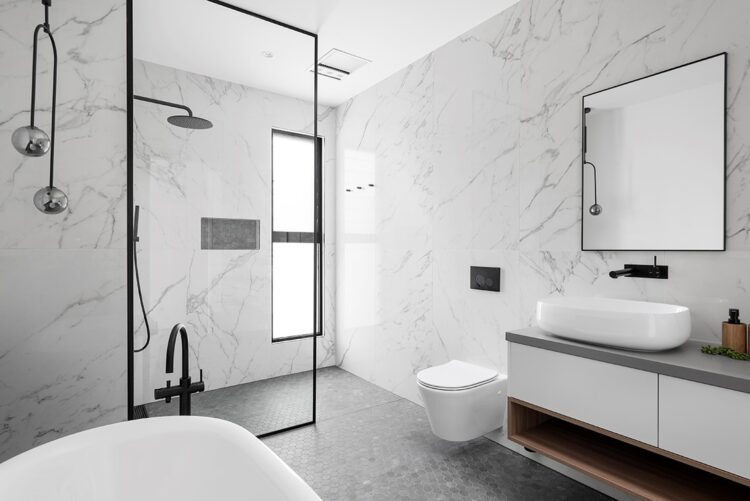
When designing a bathroom, it is important to ensure that you have the right measurements. Having accurate measurements can help you determine the size of fixtures and features, and make sure everything fits correctly in the space. White bathroom tiles have become increasingly popular in recent years, due to their ability to create a light, airy atmosphere within a space.
White bathroom tiles are a popular choice for those looking to add style, sophistication, and elegance to their bathroom. These tiles are often used to create a classic and timeless look in any bathroom.
Here are some tips on how to measure your bathroom space and get the most out of your design.
First, take into account the size of your bathroom when measuring. If you have a large family or plan on having multiple people using the space at once, then you’ll need to make sure that there is enough room for everyone. Measure from wall-to-wall and floor-to-ceiling so that you can accurately calculate how much square footage is available for fixtures such as toilets, sinks, bathtubs, or showers.
Next, take note of any obstacles in your way when measuring such as doors or windows which will affect where certain features are placed. You may also want to consider adding extra measurements if there are any built-in cabinets or shelves in order to make sure they fit properly within the design plan.
Once all of these measurements have been taken into account it’s time to start thinking about what type of fixtures will work best in this particular area based on those dimensions which were calculated previously.
Determine a Budget for Tiles
When it comes to home renovations, one of the most important decisions you’ll make is determining your budget for tiles. Tiles come in a wide range of sizes, materials, and styles and can be used on walls, floors, backsplashes, countertops, and more. Before choosing a tile for your project, it’s important to estimate the cost so you don’t end up overspending.
First off, determine how much square footage you need to cover with tiles. Measure each wall or floor area separately and then add them together for the total square footage. This will give you an idea of how much tile material you need to purchase. If there are any odd shapes or unique cuts required for installation purposes then these should also be taken into consideration as they may require additional materials or time from a professional installer.
Next, take into account the type of tile material being used. Ceramic and porcelain tiles tend to be less expensive compared to natural stone such as travertine or marble which can become quite costly depending on the size and quality levels chosen by the consumer. The grout used between tiles will also affect overall cost so consider what color grout would look best with your chosen tile material before making any final decisions on the budget.
Shop for Tile Options

If you’re looking to add a stylish and elegant touch to your home, then shopping for tile options is the perfect way to do it. Whether you’re looking for floor tiles, wall tiles, or kitchen backsplash tiles, there are plenty of options available in a range of sizes, colors, and textures.
When selecting tile for your home, the most important thing is to consider the style and type that best complement your overall design scheme. Natural stones such as marble or granite can give a room an opulent feel while ceramic or porcelain offer more durable options that come in a wide variety of colors. You may also want to think about glass tile which can be used as an accent piece to draw attention and lighten up an area.
In addition to choosing the right material, it’s also important to pick out the right size of tile. Large-format tiles are growing increasingly popular because they create fewer grout lines which result in a cleaner look with less maintenance required over time. Smaller mosaic shapes are great when creating intricate patterns on walls or floors – just make sure that if you choose this option you take into account any cutting needed during installation so you don’t end up with too many leftover pieces!
Purchase Necessary Tools and Materials

In today’s world, it is increasingly important for people to purchase the necessary tools and materials for their projects. Whether you are a professional or a hobbyist, having the right supplies can make any project easier and more efficient. The first step in making sure you have the right materials is to identify what you need. Once you know what items are required, it’s time to begin shopping around for the best prices on these items.
When purchasing tools and materials, make sure they are of good quality. There are a variety of brands available at different price points, so consider your budget when selecting which ones to purchase. This will ensure that your tools and materials will last longer and provide better results on whatever projects you may undertake in the future.
Another factor to consider when buying tools or supplies is where they come from. Shopping locally can be beneficial as it eliminates potential shipping costs and allows customers to inspect products before buying them if necessary. However, there may be certain items that aren’t easily found locally; in this case, online shopping can be an effective way of finding what you need at competitive prices with quick delivery times as well as reviews from other customers who have used them before so that decision-making isn’t based solely on a guess.
Prepare Surfaces by Removing Old Tiles, if Necessary
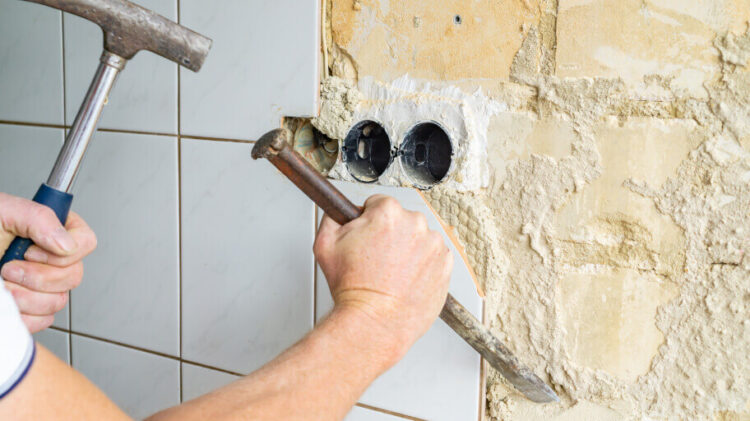
If you’re looking to give your bathroom, kitchen, or any other room a fresh look, one of the best ways to start is by removing old tiles and preparing the surface. Removing old tiles can be a messy and time-consuming process, but it’s necessary if you want to achieve professional results.
First and foremost, safety should always be your number one priority when attempting DIY projects like this. Be sure to wear protective eyewear, gloves, and dust masks when working with tile removal tools. Also, take care to check for live electrical wires behind the tiles before beginning work; if you find any wires it’s best to contact a professional electrician before continuing with the job.
Once you’ve taken all necessary safety precautions it’s time to begin removing the old tiles. If they are made of ceramic or porcelain they may require special tools such as an oscillating multi-tool with a tile removal blade attachment or an angle grinder fitted with a diamond blade for cutting through ceramic materials. If they are made of vinyl or linoleum material then scoring them in several places across their surface will make them easier to pry up using either a flathead screwdriver or putty knife along.
Lay Out a Design Plan for the Tiling Project

Designing and laying out a tiling project can be a daunting task, but with the right planning, it can be done successfully. Before starting the project, it’s important to decide what type of tile is going to be used and how much material is needed. Additionally, you need to consider how the tiles are going to be laid out and what patterns will work best for the space. Here is a step-by-step design plan for your tiling project:
Step 1: Measure the area you want to tile. This includes measuring both the length and width of each wall or floor where you plan on installing tiles. Once these measurements have been taken, determine how many tiles will need to purchase based on this size area.
Step 2: Choose your tile material and style. There are many different materials available such as ceramic, porcelain, stone, or glass tiles that come in various sizes and colors. Consider which aesthetic will work best in your space before deciding on one type of tile material over another.
Begin Tiling from the Bottom Up, Starting with a Base Row of Tiles

Tile is a great way to update the look of any room in your home. Whether you’re tiling a kitchen, bathroom, or any other area, it’s important to know how to properly install the tile. One key step in tile installation is beginning with a base row of tiles. This helps ensure that the overall project looks even and professional when finished.
When installing tile it’s essential to start from the bottom and work up. Begin by laying out your first row of tiles starting at one corner of the room and working towards the opposite corner. Make sure that all tiles are placed evenly along each wall, taking into account any doors or windows that may need cutting around. Once this first layer is installed correctly, you can move on to adding additional layers above it until your entire project is complete.
When laying out your base row of tiles there are also some precautions you should take in order to ensure success with your overall tile job:
- Measure twice: Before beginning any cutouts for doorways or windows make sure you measure twice; this will help prevent costly mistakes later on down the road during installation!
- Check levelness: Use a leveler tool to check whether each tile is even with its neighboring pieces.
Cut tiles to Fit any Odd-shaped Corners or Tight Spaces

If you’re planning a DIY tiling project, you may find yourself up against some odd-shaped corners and tight spaces. Fortunately, cutting tiles to fit these areas is relatively straightforward. With the correct tools and technique, it’s possible to achieve a professional finish in any space.
The first step is to measure the area that needs to be tiled and make sure that the tile size chosen will fit into the space required. If not, then select a tile that can be easily cut down without compromising its shape or pattern.
Once you’ve selected your tile, mark out exactly where it needs to be cut with either a pencil or marker pen on both sides of the tile. You can then use either a manual scoring tool or an electric wet saw with a diamond blade for making intricate cuts in ceramic tiles if your cuts are particularly complex. For straight edges on larger tiles, using an angle grinder can help speed up the process significantly and will give more accurate results than manual tools alone.
When cutting with an electric saw or angle grinder make sure that you wear protective goggles and gloves at all times for safety reasons as dust particles from drilling and cutting can cause serious eye injury if contact lenses are worn during this process.
Place Spacers Between Each Tile to Ensure even Grout Lines
When it comes to tiling, there is nothing more important than having even grout lines. Grout lines are the spaces between each tile that create the pattern of the floor or wall and they should be even and consistent. To ensure you get even grout lines, one trick is to use place spacers between each tile.
Place spacers come in a variety of sizes and shapes, depending on your tiling project. They are small pieces of plastic or other materials that fit snugly into the gap between two tiles, creating a uniform measurement for your grout line widths. Place spacers can also help ensure tiles lay flat against each other, preventing unsightly gaps from appearing in your finished project.
The first step when using place spacers is to choose a size appropriate for your tile size and desired grout line widths. Generally speaking, larger tiles need larger place spacer sizes for proper spacing; however, this can vary based on different factors such as flooring material or adhesive used during installation so it’s best to consult with an expert if you have any questions about which size is best for you particular project.
Seal Edges of Walls and Floor with Waterproof Sealant
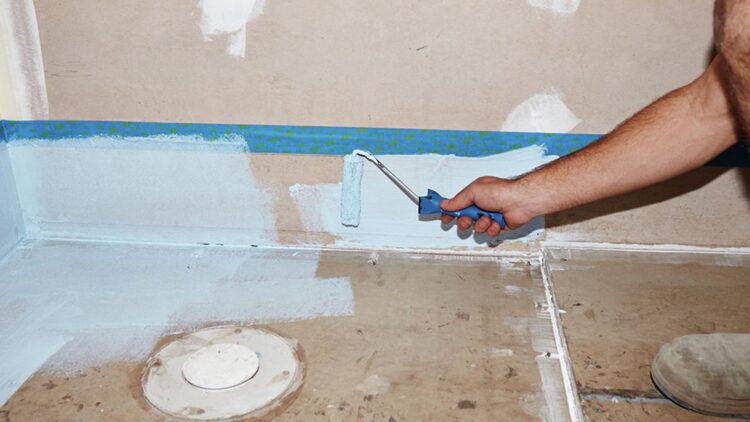
Using a waterproof sealant to seal the edges of walls and floors is an essential step in protecting your home from moisture damage. By sealing these vulnerable areas, you can help prevent water from seeping into your home and causing costly damage.
Waterproof sealants come in many varieties, so it’s important to do some research before deciding which product is best for your project. Some common types include acrylic latex, butyl rubber, and silicone caulk. Acrylic latex is a good choice for sealing around windows or doors and other areas where flexibility is important. Butyl rubber seals are best for areas that are exposed to extreme temperatures or weathering elements such as rain or snow. And finally, silicone caulk is ideal for creating a waterproof barrier along bathroom walls and floors that need extra protection against moisture buildup.
Once you’ve selected the right product for the job, it’s time to get started with the application process. First, make sure all surfaces are clean of dirt and debris by wiping them down with a damp cloth or using mineral spirits if necessary. Next, apply an even layer of waterproof sealant using either a caulking gun or applicator tool depending on the type you have chosen – be sure to read any instructions carefully.